Breaking Down a Screenplay for Production Departments
Learn how to tag production elements manually and with AI, configure department breakdown categories, manage element inventories, and export breakdown sheets.
Overview
A screenplay breakdown is the foundational step bridging creative development and physical production. For 1st Assistant Directors (1st ADs), location managers, line producers, and department heads, breaking down a script involves identifying and cataloging every tangible element — from featured props and specialized vehicles to stunt requirements, makeup effects, and costume changes — required to shoot each scene.
In this tutorial, you will learn how to:
- Lock your screenplay for production breakdown.
- Review and customize color-coded Breakdown Categories.
- Tag production entities manually in the screenplay editor with batch matching.
- Use Clapperbie's AI Assistant to automatically scan scenes and tag department elements.
- Review and export department inventories using the Elements module.
- Generate and export scene Breakdown Sheets to PDF.
Step 1: Lock the Screenplay
In Clapperbie, breakdown tagging is enabled exclusively on scripts in Locked status. This prevents unintended text edits and pagination shifts from invalidating your department breakdowns during pre-production.
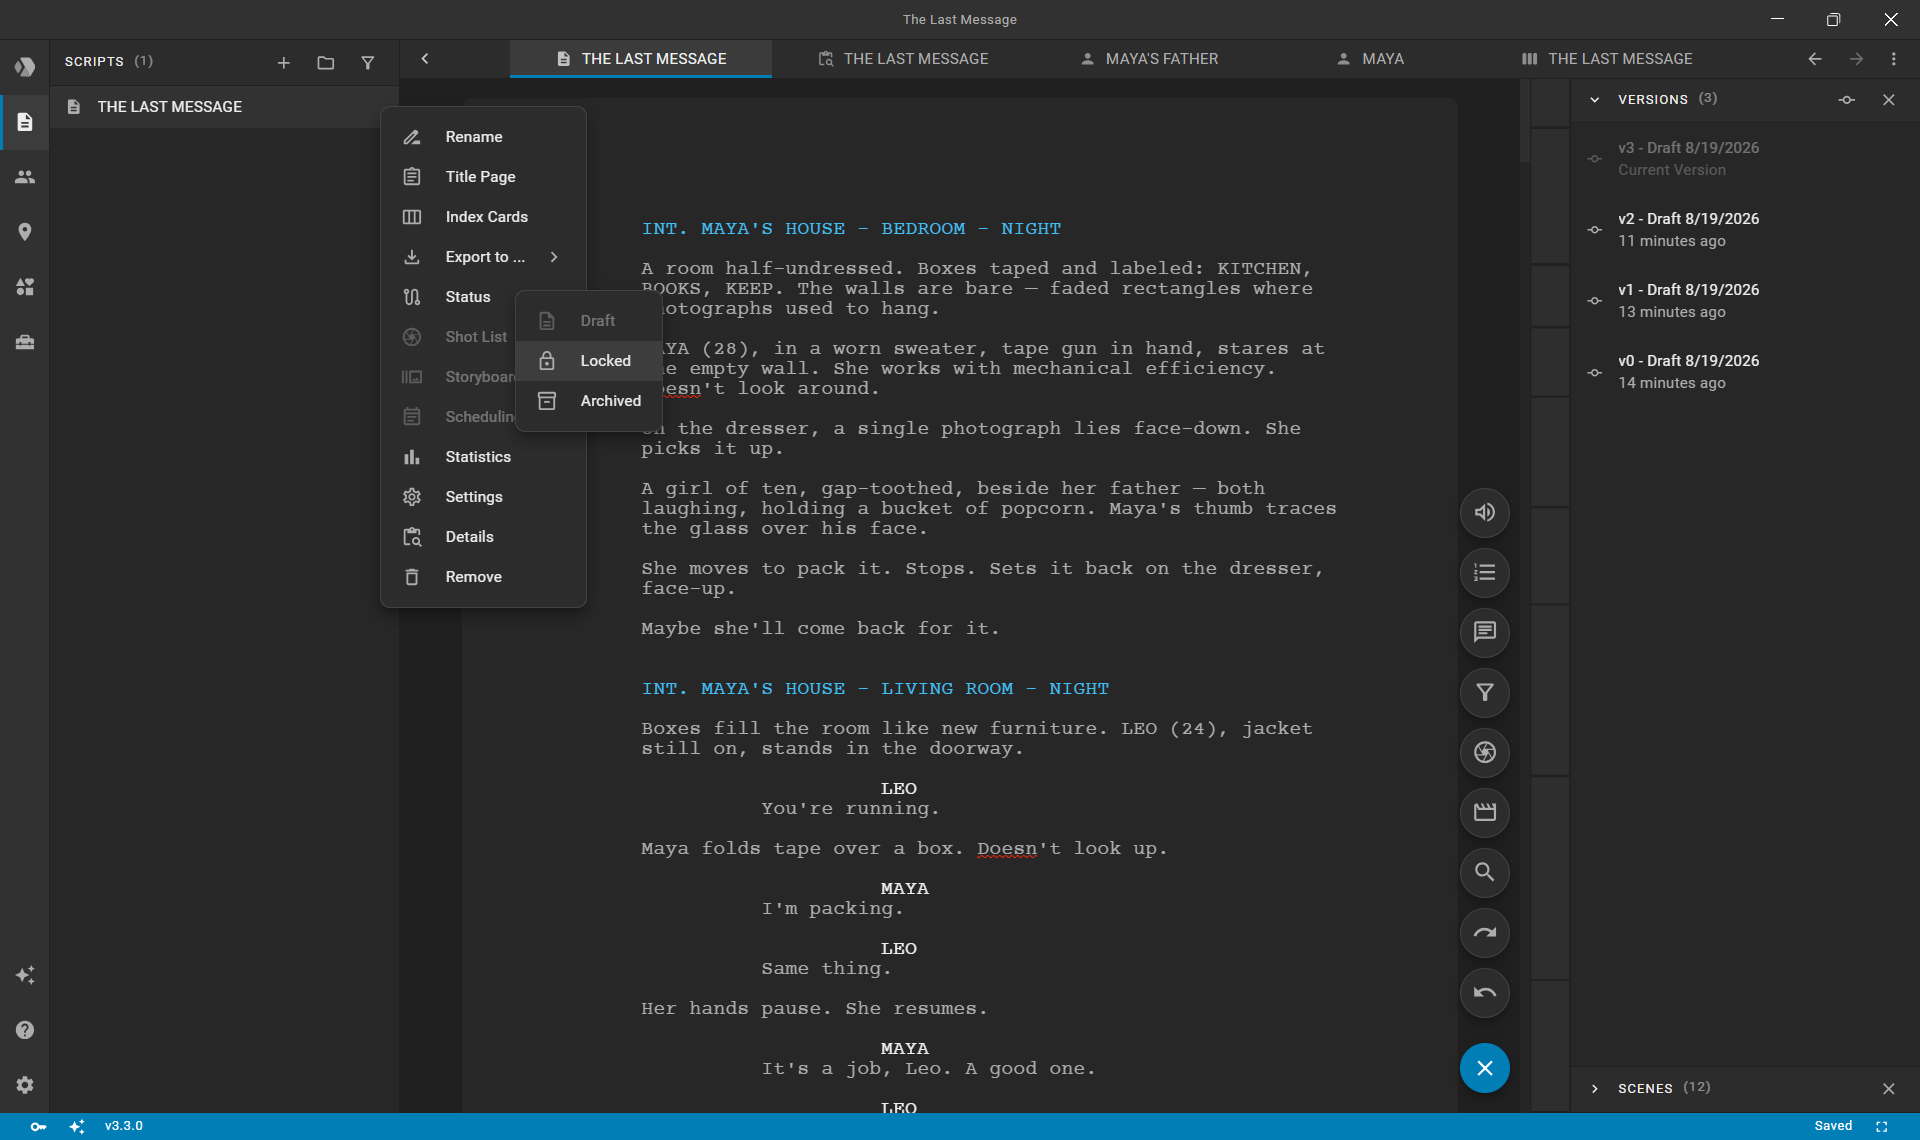
- Open the Scripts section in the left sidebar.
- Click the actions menu (
...) next to your target script. - Select Status and choose Locked.
Note: If you need to make narrative revisions later, use the Versions panel to save color-coded revision passes (Blue, Pink, Yellow) while preserving breakdown tags.
Step 2: Configure Breakdown Categories
Clapperbie provides 11 standard industry department categories, each assigned a distinctive color code for easy identification across the script and scheduling tools.
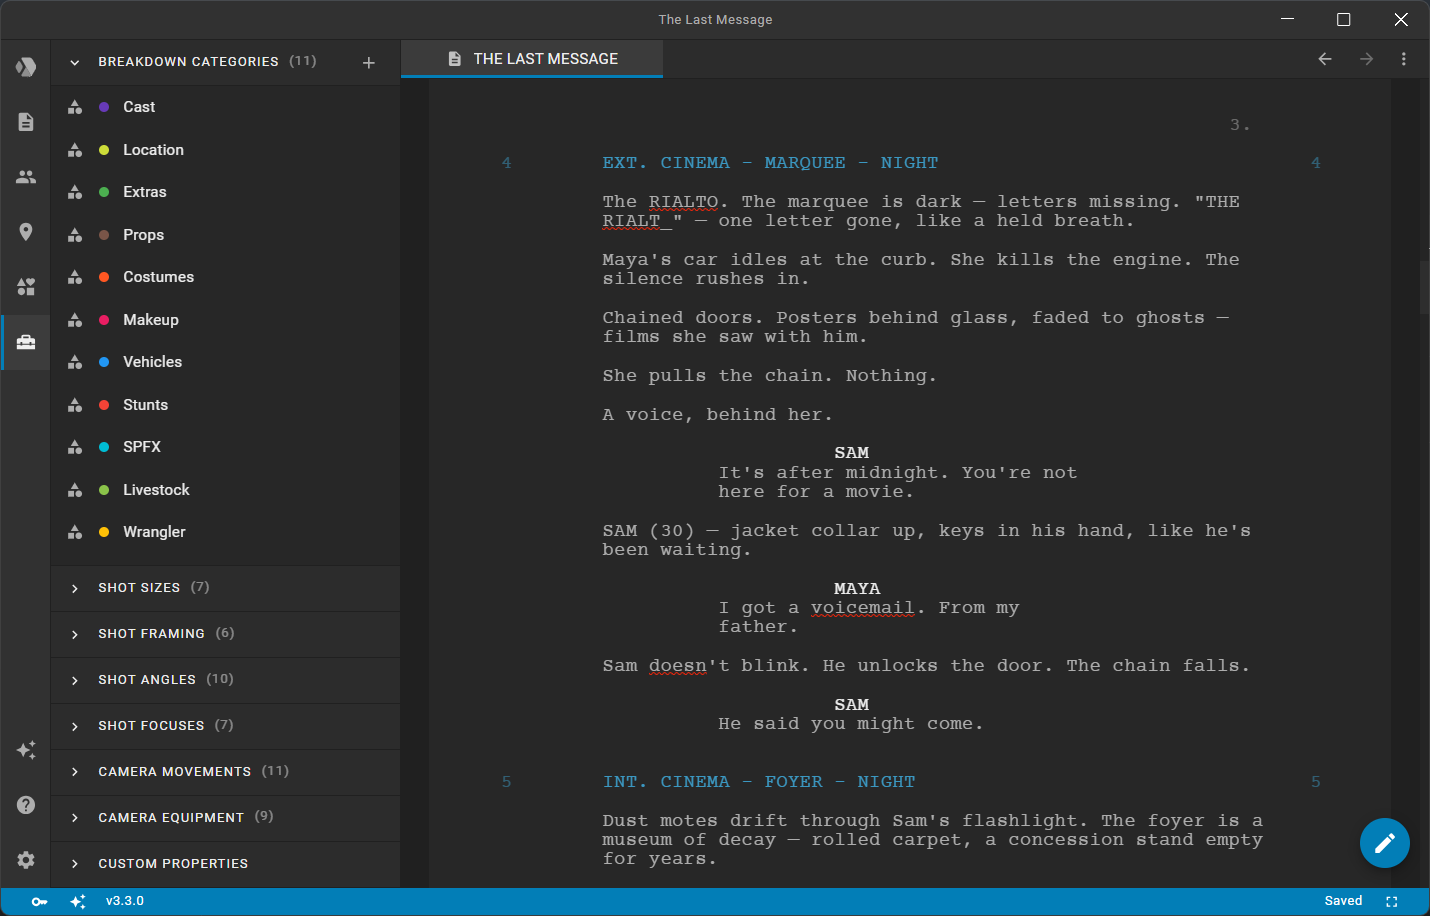
- In the left sidebar, navigate to the Tools section.
- Expand the Breakdown Categories accordion.
- Review the default categories:
- Cast (Deep Purple) — Speaking and non-speaking principal talent.
- Location (Lime) — Filming locations and real-world addresses.
- Extras (Green) — Background talent and atmosphere.
- Props (Brown) — Objects characters interact with on camera.
- Costumes (Deep Orange) — Wardrobe items, uniforms, and costume changes.
- Makeup (Pink) — Blood, prosthetics, wounds, and special makeup.
- Vehicles (Blue) — Action vehicles, hero cars, and picture transportation.
- Stunts (Red) — Physical stunts, wirework, and precision driving.
- SPFX (Cyan) — Practical physical effects (explosions, rain, smoke, squibs).
- Livestock (Light Green) — Large animals (horses, cattle).
- Wrangler (Amber) — Small animals and handlers (dogs, cats).
Adding or Customizing Categories
If your production has specific department requirements (such as Greenery, Sound FX / Playback, or VFX Markers):
- Click the + (Create Category) button in the Breakdown Categories header.
- Enter the Name, select a Color, and add an optional Description.
- Click Create. The new category immediately becomes available in tagging dialogs and element reports.
Step 3: Tag Production Elements Manually
When reviewing the script scene by scene, tag specific words or phrases directly in the editor to attach them to production categories.
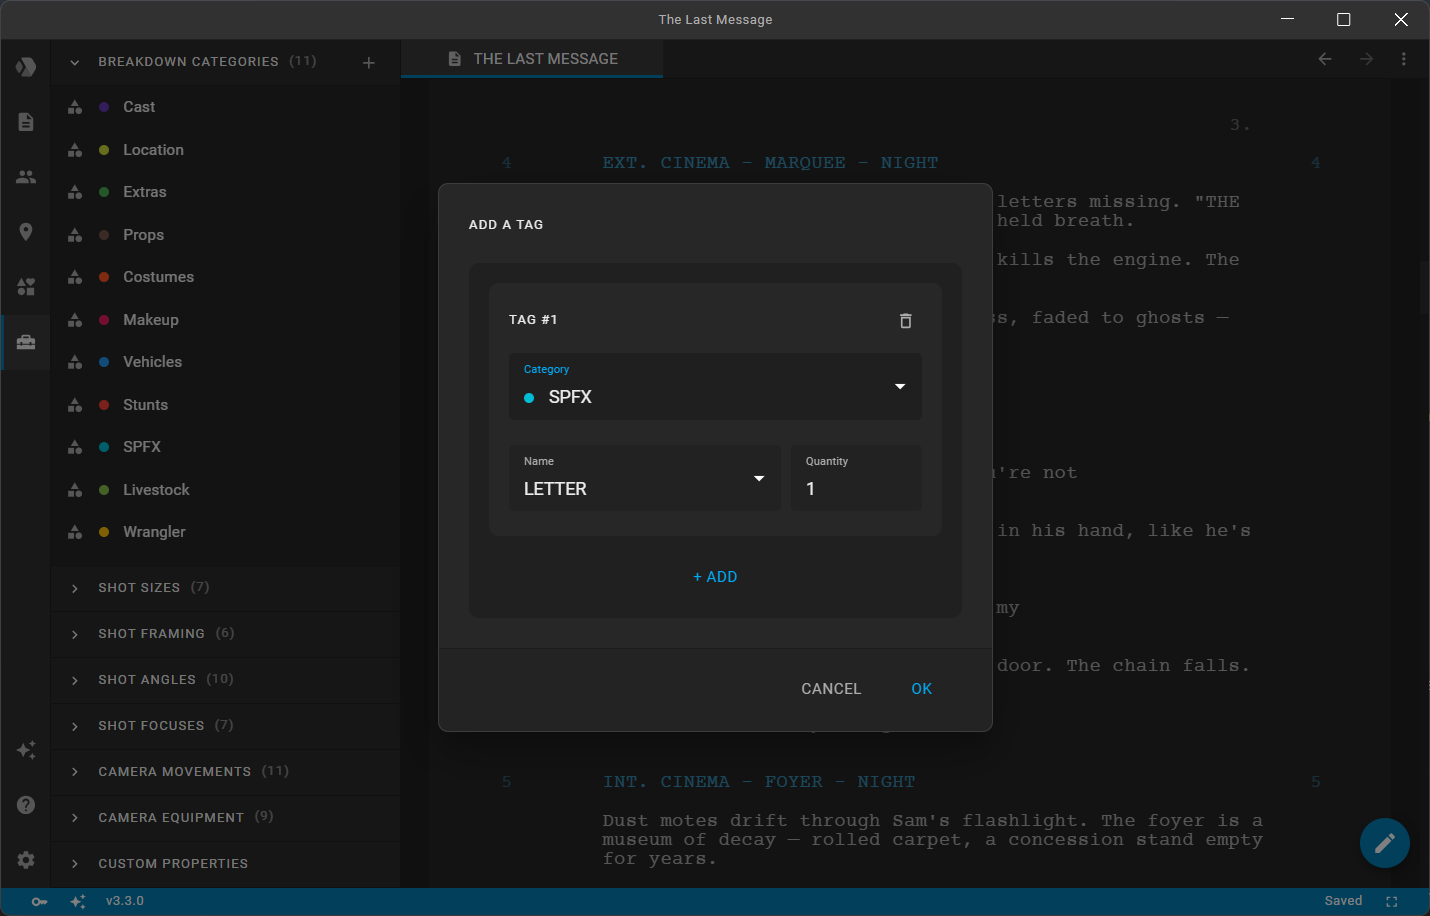
- Highlight the text representing the element (e.g.,
VINTAGE REVOLVER,BLOODY T-SHIRT,1967 CHEVY IMPALA). - In the floating selection toolbar, click Add a Tag (tag icon) or press
Alt + T. - In the Add a Tag dialog:
- Category: Select the target department (e.g., Props or Vehicles).
- Name: Enter the normalized element name. Existing elements in the selected category appear as auto-complete suggestions to avoid duplicate entries.
- Quantity: Specify the required quantity for this occurrence (default is
1). - Apply to all matches: Check this box if the item appears across multiple scenes and you want Clapperbie to automatically tag all occurrences throughout the script.
- Click OK.
The tagged text is highlighted in the script editor with a subtle background and colored underline matching the category's assigned color. Selecting any existing tag opens the Update the Tag dialog to adjust quantities, change categories, or remove the tag.
Step 4: Automate Tagging with the AI Assistant
For feature-length scripts or tight turnaround schedules, you can use Clapperbie's built-in AI Assistant to perform automated screenplay breakdowns.
The AI Assistant follows industry breakdown conventions:
- It reads available department categories directly from your project settings.
- It scans scene action and dialogue to detect props, vehicles, wardrobe specifications, stunts, makeup, and special effects.
- It reuses existing normalized element names in uppercase (e.g.,
FLASHLIGHTrather than creating separate entries forflashlight,Flashlight, andFlashlights). - It preserves existing manual tags while tagging new entities.
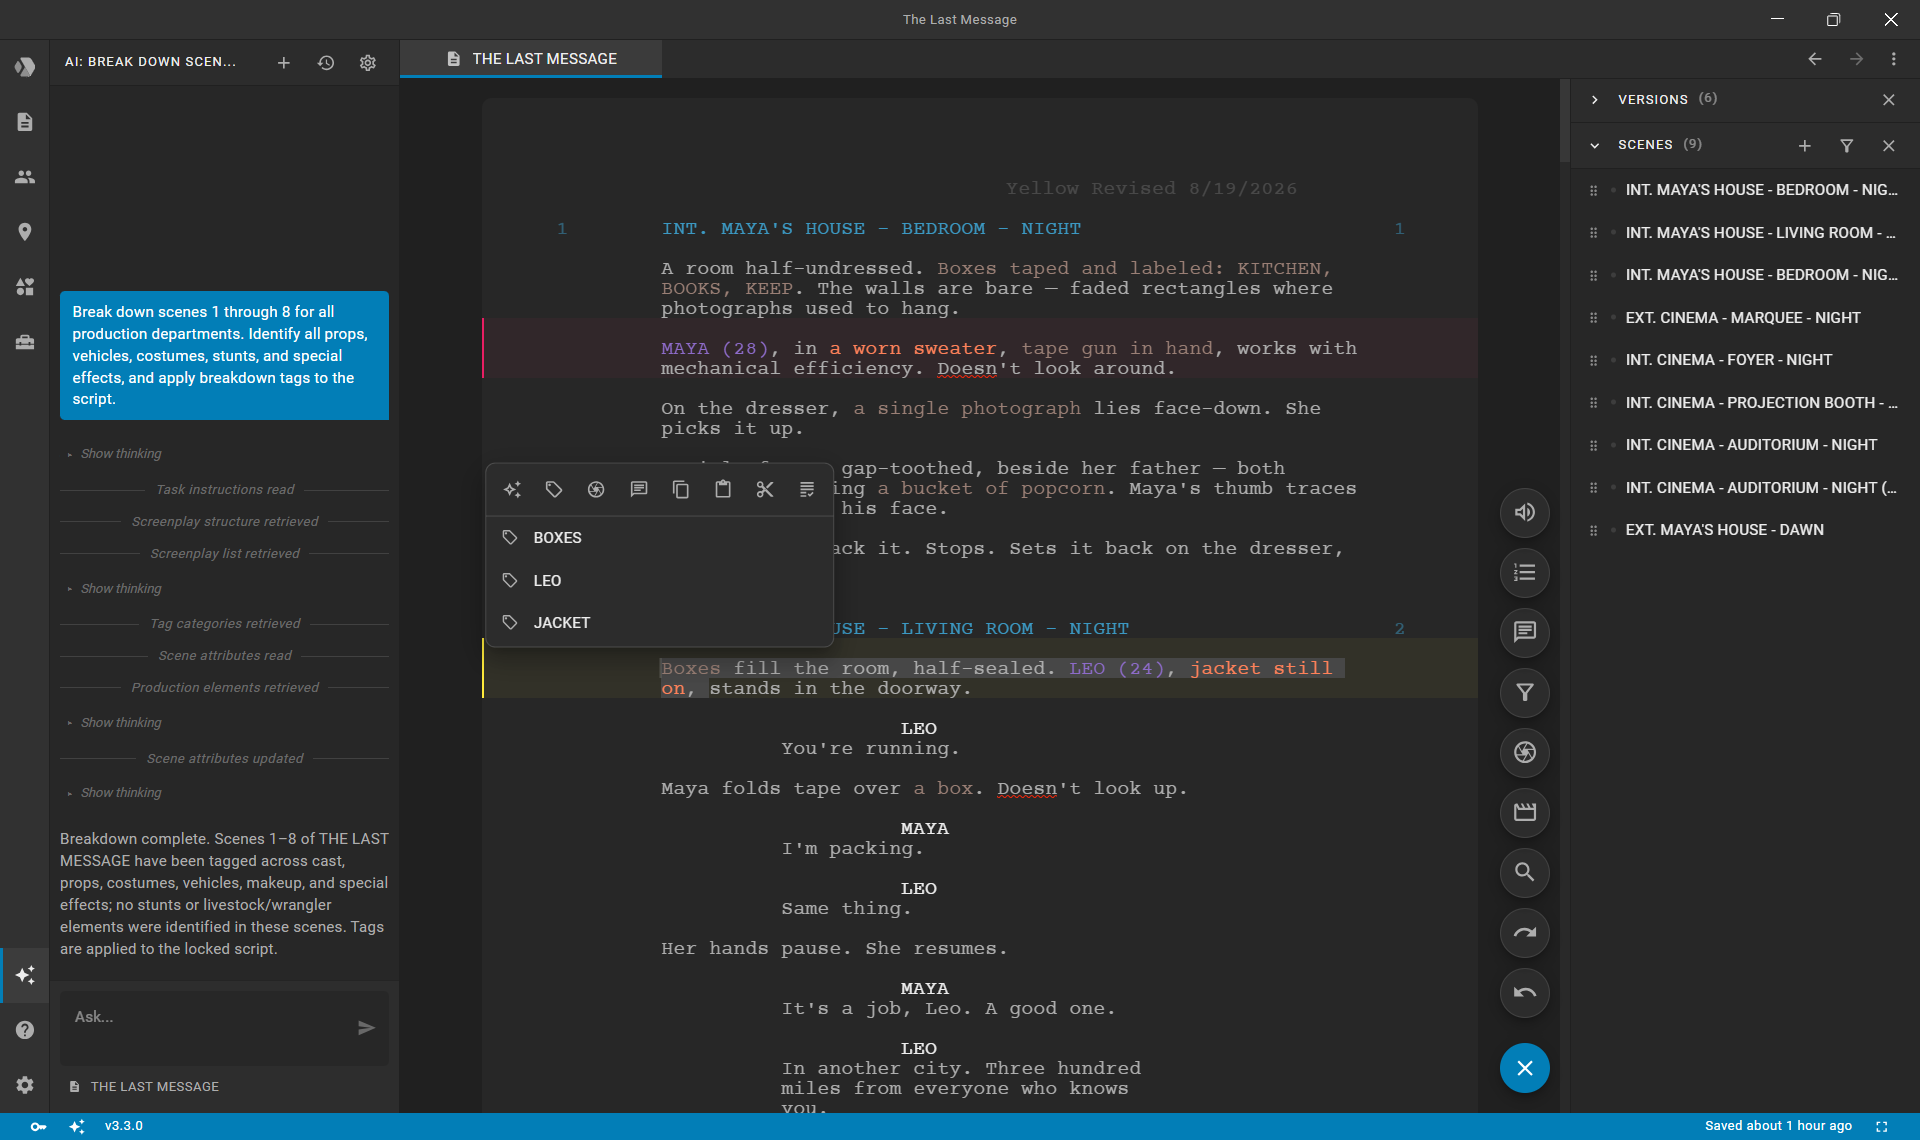
- Open the left sidebar and click AI Assistant (sparkle icon).
- Ensure your AI provider is active in the application footer.
- In the chat prompt, specify the scenes or departments you want to break down:
text
Break down scenes 1 through 8 for all production departments. Identify all props, vehicles, costumes, stunts, and special effects, and apply breakdown tags to the script. - The AI processes the scenes and applies tags directly to the screenplay text in the editor.
- Review the script editor to verify the newly placed color markers across the target scenes.
Tip: You can also ask the AI to perform department-specific passes, such as: "Scan the script and tag all vehicles and precision driving stunts for the Stunt & Transportation departments."
Step 5: Manage Inventories in the Elements Module
Every tagged entity is aggregated into the Elements module, providing a centralized asset inventory across your entire project.
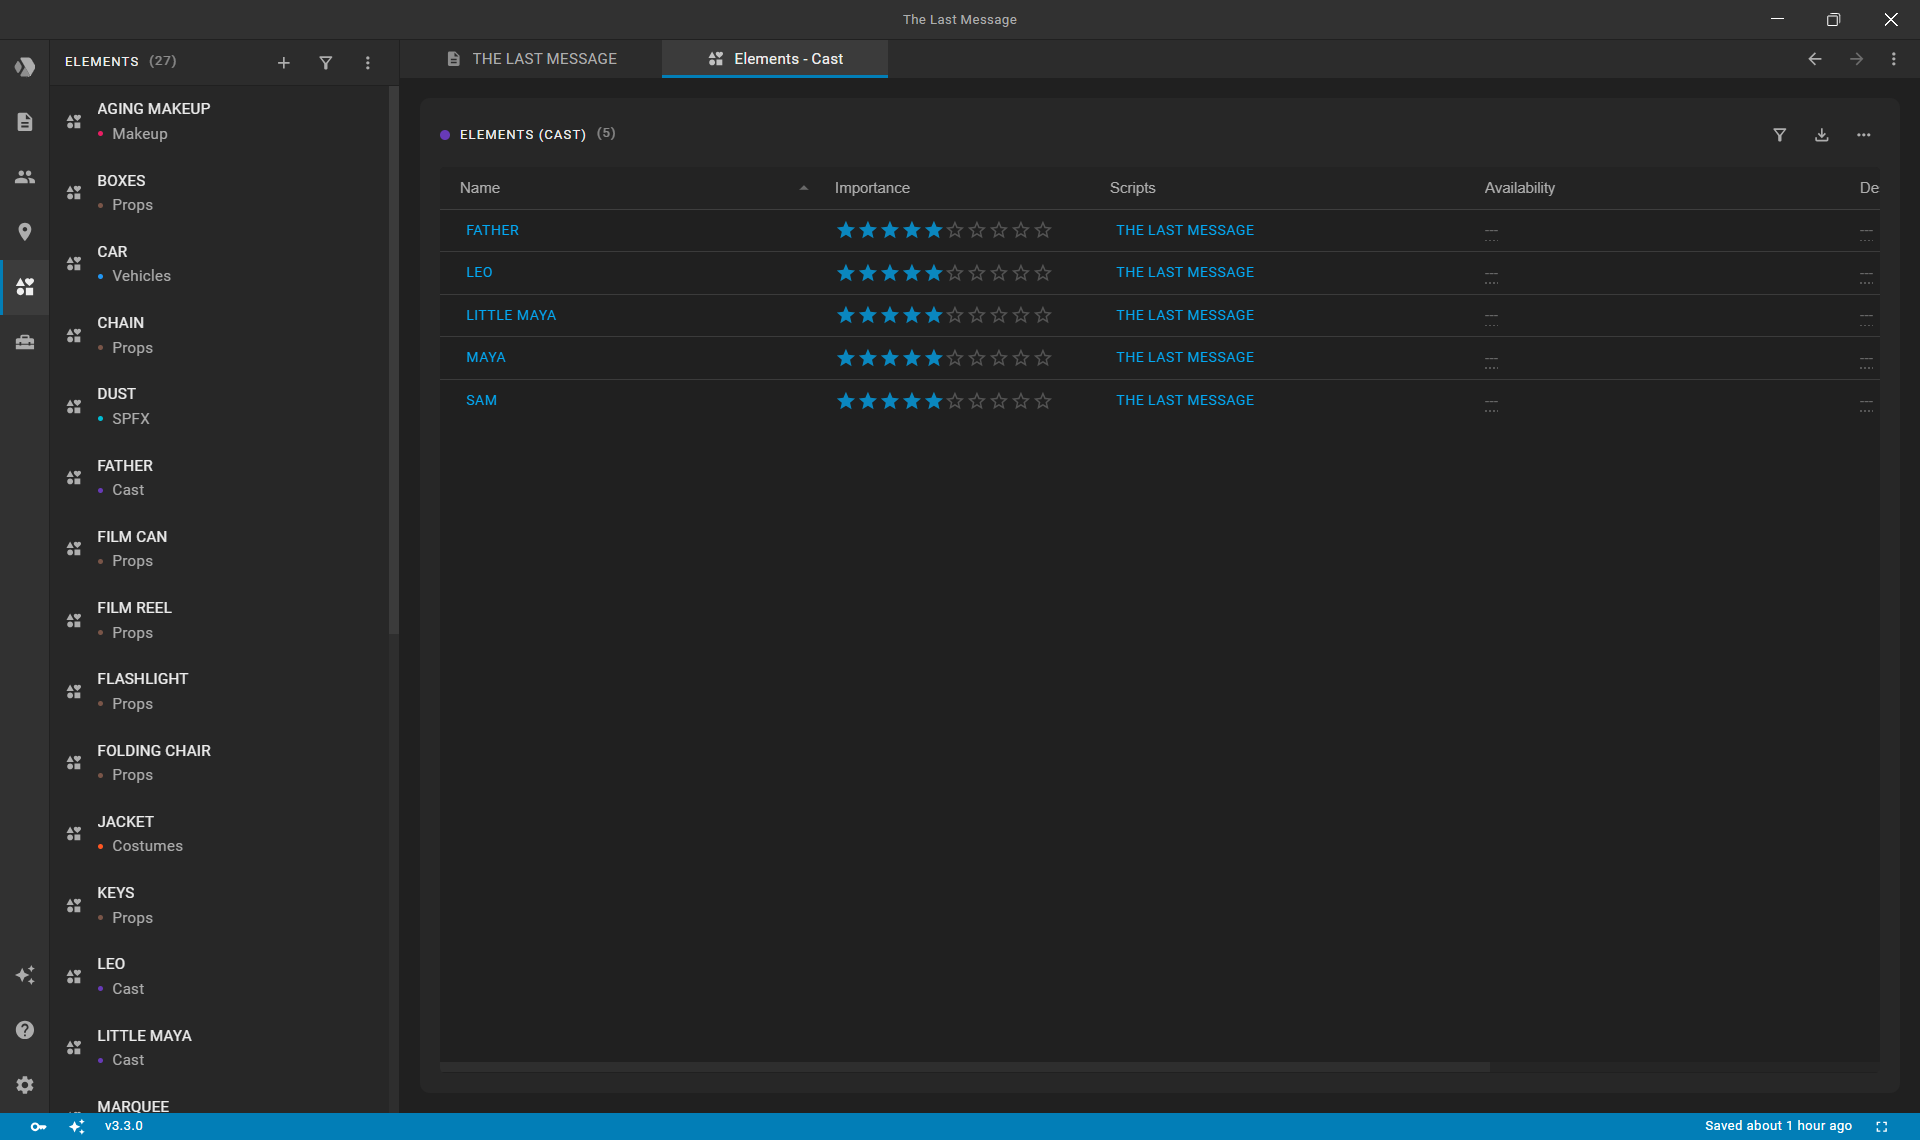
Viewing the Elements Sidebar
- Open the Elements section in the left sidebar.
- Browse the list of detected elements. Each entry displays its department color indicator.
- Use the filter action to narrow the list by specific Scripts or Categories.
- Click an element to open its Element Details editor to add notes or assign custom properties.
Department Table View and Exports
To view and export elements by department:
- In the Elements sidebar, click on any category header (or click its table action).
- The full Elements Table editor opens as a central workspace tab (e.g.,
Elements - Props):- Columns: Toggle column visibility to show element names, scene appearances, quantities, notes, and availability dates.
- Filters: Filter elements by specific script drafts or availability status.
- Export: Click Export to PDF or Export to Excel in the toolbar to generate formatted department sheets for prop masters, wardrobe supervisors, and line producers.
Step 6: Generate and Export Scene Breakdown Sheets
The 1st AD and production office use scene breakdown sheets during scheduling and call sheet preparation to review department requirements scene by scene.
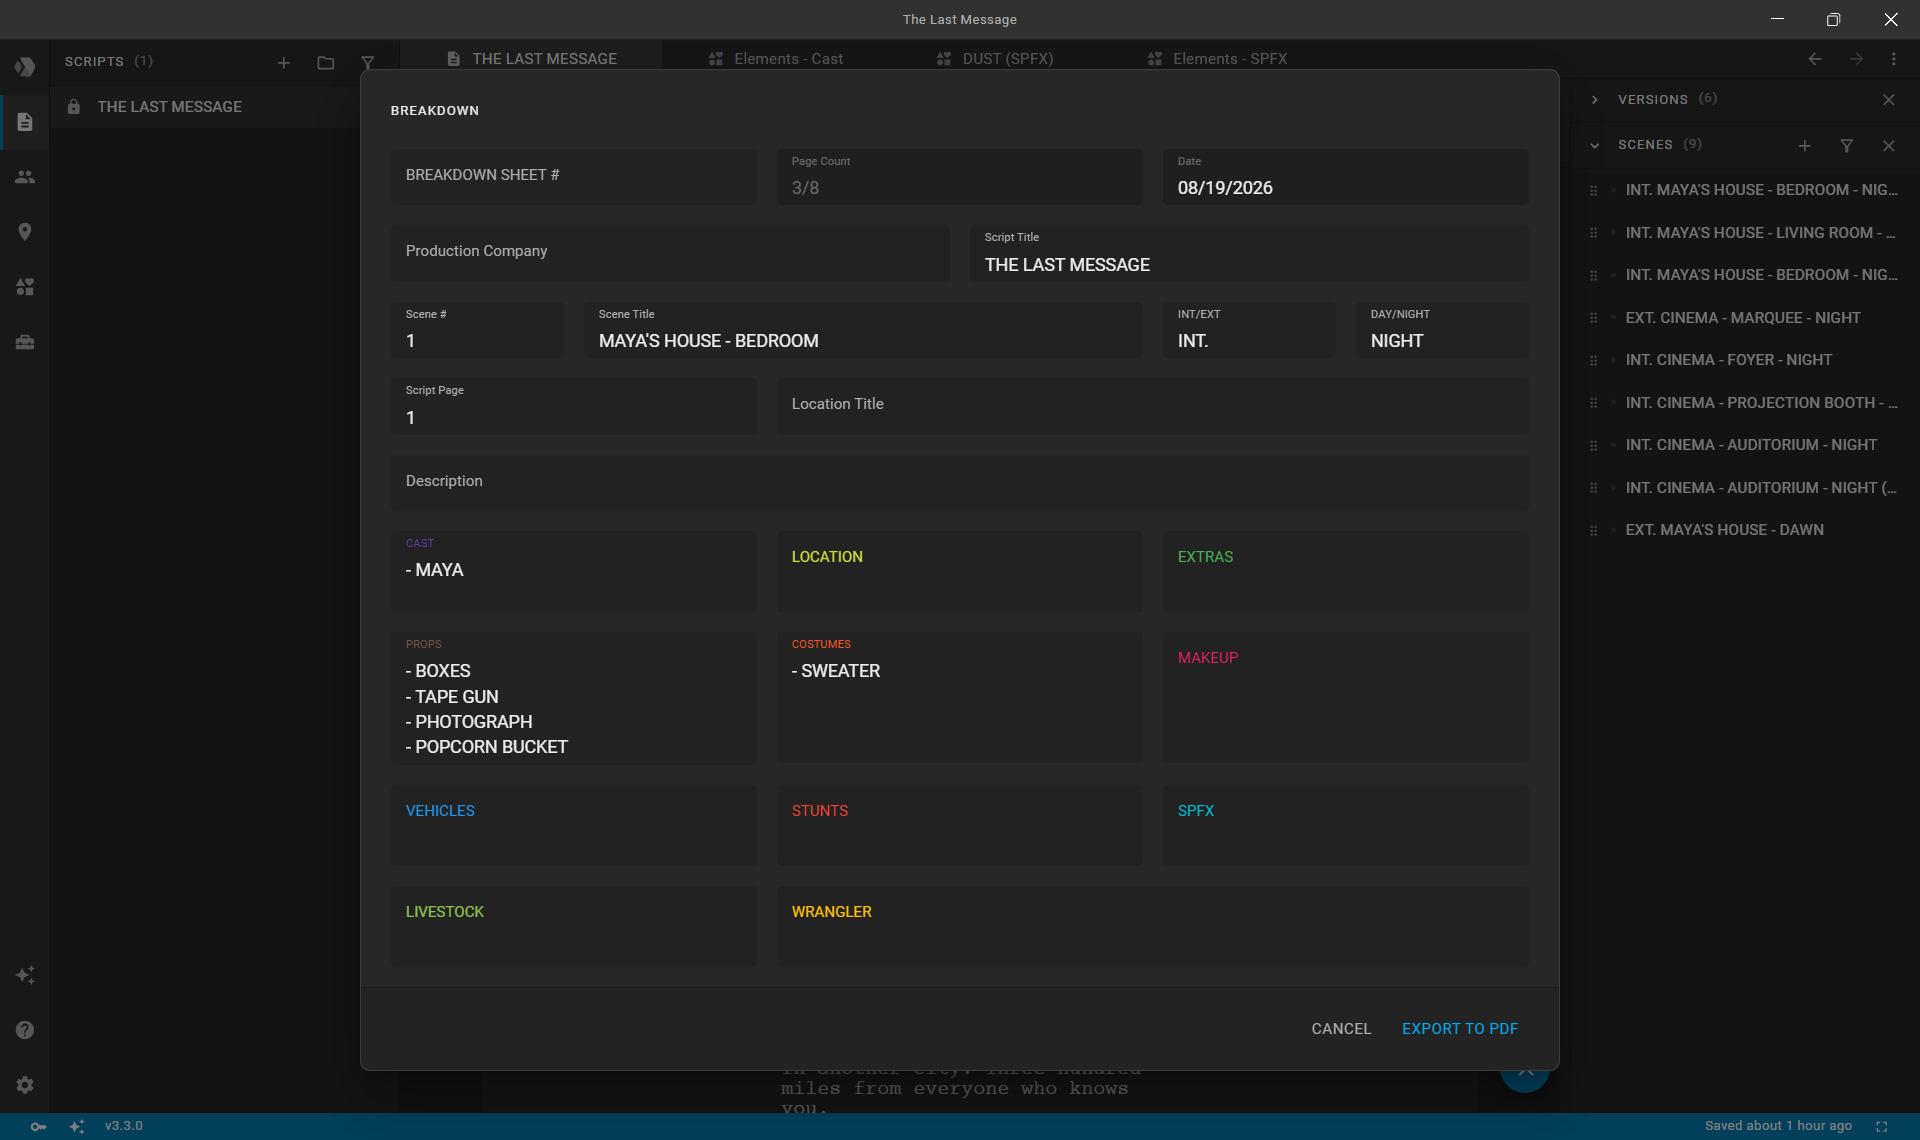
- In the script editor, click the floating action button in the bottom right and select Scenes.
- Locate the scene you want to inspect.
- Click the actions menu (
...) on the scene card and select Breakdown. - The Breakdown dialog opens, displaying:
- Header Information: Scene number, slugline (INT/EXT, setting, time of day), script page number, estimated page eighths, and location details.
- Department Boxes: Tagged elements organized into dedicated boxes for Cast, Extras, Props, Costumes, Makeup, Vehicles, Stunts, SPFX, and custom categories.
- Click Export to PDF to download a standardized breakdown sheet, or click Print to send it directly to your printer.
Summary of Results
After completing your screenplay breakdown in Clapperbie, you have:
- A locked production screenplay with clear, color-coded inline tags for all departments.
- A normalized master inventory in the Elements module with scene links and tracking metadata.
- Exportable Excel and PDF departmental element lists.
- Standardized scene breakdown sheets ready for production scheduling and stripboard creation.